python 3.11.2
OS macOS Ventura 13.4.1
以前、【初級エンジニア向け】テストって何?から一歩先へいくテスト習慣付けのススメというコンテンツを執筆したのですが、実際にユニットテスト(単体テスト)を書く作業についてきちんと紹介します。
今回はPythonとそのライブラリであるpytestを使ったユニットテストについて順を追って説明していきます。
Pythonにはもともと備わっているunittestというユニットテスト用ライブラリやnoseという少し前までデファクトスタンダードだったユニットテストライブラリがありました。しかし、最近では更新されていないためpytestを使うほうが主流になっています。
pytestとは
一般的に『unittestやnoseの上位互換なユニットテストフレームワーク』と呼ばれています。unittestやnoseと共存でき、移行が比較的簡単であることもあり、Pythonプロジェクトを抱える企業はpytestに移行するケースも少なくありません。
unittest, nose, pytestそれぞれの特徴と違い
それぞれの特徴と違いを簡単にまとめると以下となります。
- unittest: Pythonの組み込みライブラリで、より伝統的で冗長なxUnitスタイルの
- nose:
unittestを拡張したものだが現在はメンテナンスされていない - pytest: モダンかつPythonicなテストフレームワークで、活発にメンテナンスされており、3つの中で最も機能が豊富
新しいプロジェクトを始めるときは、活発なコミュニティと豊富な機能があるため、一般的にpytestを使うことを推奨します。
すでにnoseやunittestを使っている古いプロジェクトで作業している場合、それらを使い続けることは理にかなっているとも言えます。しかし、pytestはそれらのフレームワークで書かれたテストを実行可能です。
unittest
unittestはPython組み込みのテストライブラリで、xUnitスタイルに従っています。標準ライブラリに含まれており、広い範囲のテストスイートを構築するための基盤として作用します。
特徴としては以下です。
- Python標準ライブラリに組み込まれている
- xUnitスタイルに従う
pytestやnoseに比べて冗長- 多くの定型的なコードが必要(
assertEqualやassertTrueなどの独自関数あり) - フィクスチャ、テストディスカバリ、テストランナーが提供されている
nose
noseはunittestを拡張し、テストの記述、検索、実行を容易にする外部ライブラリです。
テストはnosetestsコマンドで実行できます。
- 現在はメンテナンスされていない(最終リリースは2015年)
unittestよりも利用できるプラグインが多いunittestよりも冗長性が低い- 自動的にテストコードを見つけ実行
- シンプルなテスト関数を書くことを補助
pytest
pytestはPythonの最も人気のあるテストフレームワークの1つです。よりモダンでPythonicなアプローチが特徴です。
テストはpytestコマンドで実行できます。
- シンプルな構文
- フィクスチャとさまざまなプラグインのサポート
- テストの失敗に関する詳細な情報を提供する
unittestやnoseテストも実行可能- 柔軟で拡張性が高い
- 活発なコミュニティ
pytestインストール
実際の使い方を見ていくために、pytestのインストールをしていきます。
今回はpyenvを使って余計なライブラリが干渉しない状態で進めていきます。
簡単に使ってみる
当たり前ですが、インストールしただけで何もテストファイルがない場合はそのままテストが通ります。
最小でテストを実行してみましょう。
test_xxx.pyやxxx_test.pyのようにファイル名にtestをつけるとテストファイルとして認識されます。
これを実行すると以下のようにテストが成功します。
失敗するパターンもやってみましょう。
このように失敗した箇所がわかりやすく表示されます。
実践的なpytestの使い方
pytest実行時のオプション
pytestは実行の際にpytestやpython -m pytestのようにすべてで実行するかファイル名を指定するかといった使い方ができます。さらに、オプションを与えることで出力をコントロールしたりデバッガを表示したりできます。
一覧にすると以下になります。
| オプション | 説明 |
|---|---|
-h, --help | ヘルプの表示 |
-v, --verbose | キャッシュや成功結果など、細かな結果を表示 |
-q, --quiet | シンプルな失敗情報のみ表示 |
-k EXPRESSION | 与えた文字列にマッチするテストのみ実行 |
-x, --exitfirst | 最初にテストが失敗した箇所で停止 |
--maxfail=num | テスト失敗においてnumで指定した数で停止 |
-s, --capture=no | コード内のprint()を表示 |
-l, --showlocals | トレースバック内でローカル変数を表示 |
--ff, --failed-first | 失敗済みのテストを先に実行 |
--durations=num | num個のテストを遅い順で表示 |
--cov=my_module | my_moduleのカバレッジを計測(要pytest-cov) |
--cov-report=term | カバレッジレポートの種別(ターミナル、HTML, XMLなど)を指定(要pytest-cov) |
-m MARKEXPR | マーカーを指定してテストを実行 |
--junitxml=path | 指定したパスにJUnit XML形式のレポートを作成 |
--setup-show | セットアップとティアダウンを表示 |
--doctest-modules | モジュール内にあるdoctestを実行 |
-r chars | charsで指定した形式で出力をカスタマイズ |
--collect-only | テストを集約して表示するが実行はしない |
--pdb | デバッガを出力 |
--lf, --last-failed | 最後に失敗したテストを実行 |
--tb=style | トレースバックを指定のstyle(short, long, nativeなど)で出力 |
結果にコメント
自然語のコメントをつけることで「何を期待していたが得られなかったか」をよりわかりやすくできます。
よく使うデコレータや関数
基本的にpytestは予約語であるassertを覚えておけば基本的な使い方は可能です。
assertに続くコードがTrueを返せば成功、Flaseを返せばテストは失敗します。
それ以外にも、pytest独自のデコレータや関数を覚えておけば便利に使えます。
pytest.raises()
例外を検出する際に使います。
例として、2つの数値を除算する関数があるとします。ゼロで割ったときにZeroDivisionErrorが発生するようにします。
そして、ゼロで割ったときのテストを用意します。
withでそのコンテキスト内に発生した例外をキャッチpytest.raises(ZeroDivisionError)は、withブロック内でZeroDivisionErrorが発生することを保証withブロック内のコードがZeroDivisionErrorを発生させなければテスト失敗
または、match引数を使えば例外メッセージが特定の文字列にマッチするかどうかをテストできます。
@pytest.texture()
このデコレータはフィクスチャを宣言します。
フィクスチャとは、テストの中で使いたい特定のオブジェクトや値を返す関数のことです。たとえば、データベース接続や設定データなどを返すようなものです。
@pytest.mark.[MARK_NAME]
特定のタグでテスト関数をマークします。
これにより、テストを選択的に実行できます。カスタムマーカーを定義できますし、組み込みのものもいくつかあります。
@pytest.mark.skip(reason=None)
このデコレータは、特定の条件下あるいは無条件でテスト関数をスキップするようにマークします。
@pytest.mark.skipif(condition, reason=None)
このデコレータは、条件がTrueの場合にテストをスキップするようにマークします。
@pytest.mark.parametrize(argnames, argvalues)
このデコレーターを使うと、テスト関数を異なる引数で複数回実行できます。
@pytest.mark.xfail(reason=None, raises=None, run=True, strict=False)
このデコレータは、テストが失敗することを想定していることを表します。
pytestを使う際のディレクトリ構成
pytestのディレクトリ構成はプロジェクトごとに合意が取れたものであればチーム内で共有しやすいですが、一例を提示しておきます。
このケースだと基本的にsrc/ディレクトリへ実際のアプリケーションコードを入れ、tests/にすべてのテストファイルを集約しています。
指定のテスト実行
先述したオプション-kによる実行するテストの指定以外にも、以下の方法で実行するテストを指定可能です。
例として、先ほどのディレクトリ構成のmymoduleにクラスを作成してみます。
これは以下それぞれの指定の仕方でテスト可能です。
pytest tests/unit/mymodule/test_mymodule.pypytest tests/unit/mymodule/test_mymodule.py::test_module
テストをまとめるためにクラス化した場合は以下のようにできます。
pytest tests/unit/mymodule/test_mymodule.py::TestMyModulepytest tests/unit/mymodule/test_mymodule.py::TestMyModule::test_module
fixtureの事後処理
pytestでは、フィクスチャはセットアップアクションとティアダウン(またはポスト)アクションの両方を持つことができます。これらはそれぞれ、フィクスチャを使用するテスト関数の前と後に実行されるアクションです。
セットアップコードはフィクスチャのyield文の前に行うすべてのことで、ティアダウン(またはポストアクション)コードはyield文の後に行うすべてのことです。
たとえば、データベースシステムをテストしているとします。テストを実行する前にデータベースへの接続を確立し、 テストが終わったら接続を閉じたいとします。
conftest.pyの使い方
pytestでは、conftest.pyはディレクトリ内の複数のテストファイルで利用可能なフック、フィクスチャ、その他の設定を定義できます。主なメリットはコードの重複を避け、設定とフィクスチャのための一元的な設定データとして機能することです。
conftest.pyの使い方は以下の通りです。
conftest.pyをテストファイルがあるディレクトリ、または任意の親ディレクトリに設置(pytestは自動でconftest.pyを検知する)conftest.pyでフィクスチャを定義conftest.pyでフックを使う- 任意のCLIオプションを追加
- テストデータの共有
例として、データベースフィクスチャを作ってみましょう。
カスタムオプションを定義した場合、以下のような形でpytestを実行できます。
ヘルパーの作成
pytestでは、テストの一般的な操作を支援するヘルパー関数を作成し、コードの再利用性と可読性を高めることができます。デフォルトでは組み込みのヘルパーを持ちませんが、ユーティリティ関数を作成するための標準的なPythonのアプローチを利用するだけで簡単に作成できます。
例として、Webアプリケーションをテストしていて、ランダムなユーザーデータを生成する必要があるとします。以下のようにヘルパーを作成していきます。
これを以下のようにテストで利用します。
ヘルパーを利用する際は、以下のことに注意してください。
- ヘルパーは副作用を発生させてはいけない(ステートレスであるべき)
- 外部システムと相互作用するヘルパーについては、セットアップとティアダウンの機能を利用できるようにフィクスチャに変換することも検討すべし
- この例では
utils.pyのように別のファイルとして設置してインポートして使うべし - DRY原則を守り省コード化するために使おう
便利なpytest拡張ライブラリ
pytestはその他の外部ライブラリを利用することでより便利に利用できます。
テストの順番をコントロール pytest-ordering
pytest-orderingを使うと、テストの順番を制御可能です。統合テストであれば、データフローやワークフローが関係するケースも多々あるため、この拡張は有用です。
インストールにはpipからできます。
カバレッジ(網羅性)を調べる pytest-cov
pytest-covはコードカバレッジを測定するライブラリです。
pipでインストールしましょう。
以下のようなディレクトリ構成でテストをするとします。
ここで以下のコマンドを実行します。
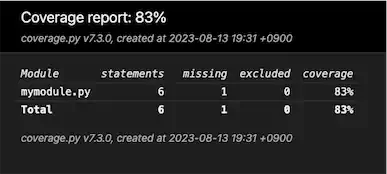
すると、以下のような結果を得られるはずです。
この結果は、mymodule.pyのテストカバレッジが83%であることを示しています。これは、モジュール内のプログラムの67%がテストによって実行されたことを意味します。
HTMLレポートのようなより詳細なレポートが欲しい場合は次のようにします。
実行すると、htmlcov/が生成され、ディレクトリ以下にHTMLファイルが生成されます。これをブラウザで表示すると以下のようになります。

pytest-cov結果
カバレッジ結果に含めるファイルや除外するファイル、ディレクトリを指定できます。
-cov-fail-under=80: カバレッジが80%未満の場合、テスト実行が失敗-cov-branch: 条件分岐のカバレッジ計測
HTML形式で結果を表示 pytest-html
続いてpytest-htmlです。これもpipでインストールできます。
先ほどのtest_mymodule.pyを以下のようにします。
この状態だとtest_failure()がテスト失敗として検知されます。
pytest-htmlでHTML化しましょう。
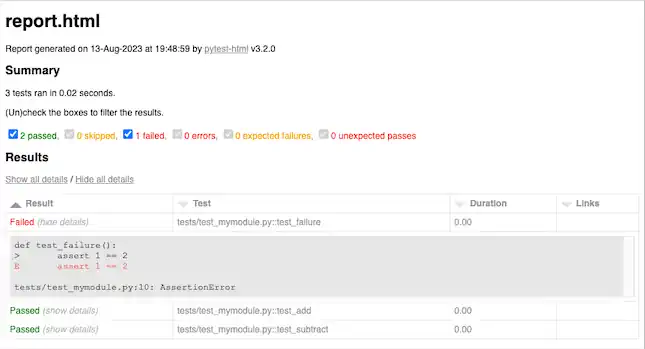
これによって出力されるreport.htmlをブラウザで表示すると以下のようになります。

pytest-html結果
上記のレポートは下記のような結果を示しています。
- 合格、不合格、スキップされたテストの数などを示す要約
- 各テスト、そのステータス(合格、不合格など)、および追加情報が記載された詳細
- 失敗したテストにおける予想結果と実際の結果の詳細な比較
テストデータ操作 pytest-datadir
pytest-datadirはテストで使用するデータファイルとディレクトリの管理を簡単にします。テスト固有のデータディレクトリへのアクセスを提供するdatadirフィクスチャを作成します。
インストールはpipです。
今回は以下のようなディレクトリ構成で試してみます。
tests/data/ディレクトリには、テスト専用のデータファイルを置きます。
test1.txt, test2.txtには適当に文字を書いておきます。
もしこれが空の場合はテスト失敗、上記のように文字が入っていればテスト合格となります。
pytest-datadirは下記のような動作をしています。
- datadirフィクスチャは
dataという名前のディレクトリを探査。 1, このdataディレクトリを指すpathlib.Pathオブジェクトをshared_datadirの形で提供。 datadirの場合はテストファイルと同名のディレクトリを参照。
モックを作る pytest-mock
pytest-mockは、unittest.mockライブラリをpytestに統合し、便利なモッカーとして機能します。
これもまた、pipでインストール可能です。
例として、特定のWebサイトからタイトルを抽出したいとします。
この関数は与えられたURLからWebサイトのタイトルを取得します。実際のHTTPリクエストを行わずにこの関数をテストするには、pytest-mockを使ってrequests.getをモックします。
- モッカーのフィクスチャは
pytest-mockで提供されている mocker.patch()は一時的に本物のrequests.get関数を定義済みのmock_responseを返すモックに置き換え- 実際の
requests.getはテスト終了時、元に戻る
テストを書く習慣は上級を目指すエンジニアに必須
規模が大きいアプリケーションだけでなく、使い捨てのようなコードも含め、テストを書く習慣をつけることでコードの品質は格段に上がります。自分がコードに何を期待し、何を成し遂げなくてはいけないかを自問自答する意味でもテストを書く習慣をつけていきましょう。
「この人すごいな」と感じるエンジニアとチームになるとわかりますが、必ずといっていいほどテストをプロジェクト初期から書いています。
PullRequestを送っても「テストを書いてください」と指示されるため、Approveされずにpushし直す作業が発生するため、そのような無駄を省くためにも普段からテストを習慣づけましょう。
もしまだ現在のプロジェクトにテストコードが存在しなければ、ぜひあなたが牽引してテストをチーム内で流行らせていきましょう。


